Tech
Generic PnP Monitor: A Comprehensive Guide to Fix Issues with it
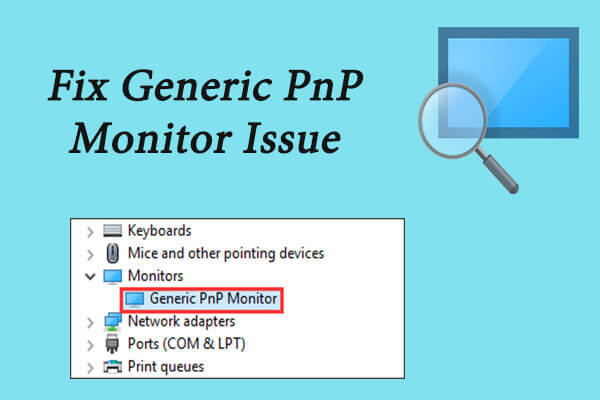
Generic PnP Monitor is a common thing among Windows OS users. PnP stands for Plug and Play. It is actually a part of your computer or laptop that is in charge of adapting the hardware changes on the device. The primary responsibility of the PnP is facilitating the additions and removals of external devices without requiring configurations or drivers.
Therefore, the message saying the Generic PnP Monitor is running should only appear on the screen of your PC if you have attached an additional monitor. If the message pops up without doing so, then your PC is reading the monitor as an external device. And, in this blog, we have discussed how to fix it when it happens.
What Causes Generic PnP Monitor?
Usually, the issue occurs due to one of the following 4 reasons. These are
- A defect in HDMI, VGA, or any other cable
- Outdated, obsolete, or corrupted Generic PnP monitor driver
- An issue with the connection
- Defects in the external monitor
Regardless of the reason, this message can disrupt your work. So, try to use the fixes that we have discussed to resolve the issue as soon as possible.
5 Proven Hacks to Resolve Generic PnP Monitor Issue
We have put together a step-by-step guide in this section to resolve the issue. So, try the fixes with the help of this guide. One of these fixes will surely be of help.
1.Re-plug all the Cables
- At first, turn the PC off
- Then, take out all the cables attached to the monitor one by one
- Give the PC some rest for 5-10 minutes
- After that, replug all the cables appropriately
- Finally, turn the PC on and check for the issue
2. Update the Generic PnP Monitor Driver
- Open Device Manager using Start menu
- Locate and expand Monitors
- Then, locate Generic PnP monitor driver and right-click on it
- Click on Update Driver
- Now, click on Search Automatically for Updated Driver Software and follow on-screen commands
3. Run Windows Troubleshooter
- Begin by pressing Windows + I from keyboard
- As the Settings menu opens, locate and select Update & Security
- Then, click on Troubleshoot
- Now, find Hardware & Devices and click on it
- Lastly, click on Run the Troubleshooter and wait for the process to finish
4. Update Display Adapters
- Open Device Manager from Start option
- Locate and select Display Adapters
- Then, locate your PC’s Display Adapters and right-click on it
- From the list, click on Update Driver
- Finally, proceed with Search Automatically for Updated Driver Software and follow on-screen commands
5. Reinstall Generic PnP Monitor Driver
- Again, open Device Manager like you did for the previous fix
- Locate and select Monitors
- Find Generic PnP monitor driver from the options and right-click on it
- Then, click on Uninstall
- Once the process complete, expand Action
- Then, click on Scan for Hardware Changes
- Finally, restart your PC
Wrapping Up
We sincerely hope that any of these 5 fixes will resolve the issue you are facing. However, in case you face any issues, feel free to seek professional assistance. And for better results, make sure to restart your PC after trying each hack. Restarting helps the changes to take place.
Read Also: Facebook Videos Marketing – Know How to Grow Your Business

Top 5 Benefits of Hiring Reliable House Cleaners in Melbourne

How to Remove Personal Data from Data Brokers

Bridging the Gap: Challenges and Solutions for Multilingual Events in KenyaBridging the Gap: Challenges and Solutions for Multilingual Events in Kenya

How to Choose the #1 Ranked Phone Data Service Platform

Affordable Virtual Assistant

Effective WordPress Maintenance and Brand Revamping: Key Strategies for Success

iPhone 15 Pro Max Price in Pakistan: A Comprehensive Review

Exotic Escapes: Unveiling the Most Exclusive Villas in North Goa

Earn Profits with Ellyx P2P Cryptocurrency Exchange

Top Small Business Bank Accounts in the UK: Find Your Perfect Fit Today
-

 Blog1 year ago
MyCSULB: Login to CSULB Student and Employee Portal – MyCSULB 2023
-

 Android App3 years ago
Cqatest App What is It
-

 Android1 year ago
What Is content://com.android.browser.home/ All About in 2023? Set Up content com android browser home
-

 Software2 years ago
A Guide For Better Cybersecurity & Data Protection For Your Devices
-
Latest News2 years ago
Soap2day Similar Sites And Alternatives To Watch Free Movies
-
Android2 years ago
What is OMACP And How To Remove It? Easy Guide OMACP 2022
-
Android3 years ago
What is org.codeaurora.snapcam?
-
Business2 years ago
Know Your Business (KYB) Process – Critical Component For Partnerships